Get started
1. Set the EV_KEY environment variable
First thing you need is an EV_KEY which you can get at the following link. An email address is required to get the free key.
When you receive it, make it available in your terminal:
export EV_KEY=yourNewEVKEY2. Run Envoy container
Make sure you have Docker running (installation instructions here) with at least 2 CPUs and 2GB RAM.
To run Envoy, all you need is to run the docker run command with the envoyproject/server image and with the EV_KEY environment variable set.
Open a terminal and execute the following command:
docker run -it -p 7000:7000 -p 7500:7500 \ --name envoyproject-server \ -e EV_KEY=$EV_KEY --rm \ -v /tmp/envoy/config:/etc/envoy \ -v /tmp/envoy/data:/var/opt/envoy \ envoyproject/server| Option | Description |
|---|---|
-it | allows interaction with the container |
--name envoyproject-server | names the container envoyproject-server |
-p 7000:7000 -p 7500:7500 | exposes 2 ports: port 7000 - used by the indexer process and port 7500 - the searchead where the UI is located |
-e EV_KEY=$EV_KEY | provides the EV_KEY as environment variable to the container |
-v /tmp/envoy/config:/etc/envoy | maps the /tmp/envoy/config directory from your system to the /etc/envoy directory from the container. The configuration file envoyconfig.yml will be generated here |
-v /tmp/envoy/data:/var/opt/envoy | maps the /tmp/envoy/data directory from your system to the /var/opt/envoy directory from the container. Here the data of Envoy will be stored. |
envoyproject/server | the name of the Envoy image on Docker Hub |
What gets started?

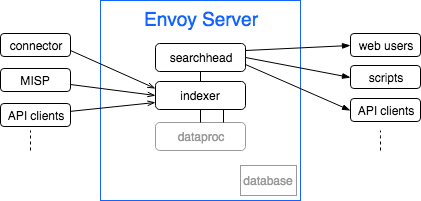
The Envoy server container has 4 microservices:
- searchhead - serves the web interface and provides an API server that can be used by scripts or other processes.
- indexer - internal component that receives data from the connector and stores it. It will also forward to dataproc for further processing.
- dataproc - data processing component, that enriches the data (currently only with geolocation from RIPE) and performs additional calculations and data mining. It receives data from the indexer, and uses the searchhead API to perform actions and queries on the system.
- connector - component responsible for fetching and parsing data source providers.
- /etc/envoy/envoyconfig.yml - configuration file generated inside the container. If you run the above
docker runcommand, you can access it from your local machine at/tmp/envoy/config/envoyconfig.yml. The documentation for the config file is .
3. Verify the installation
When the Envoy container finishes the setup and is running, you can access the UI on http://localhost:7500
The default username and password are admin / admin . Please change them after your first login.
4. Insert some data
By default, Envoy comes with no data.
In the UI, on tab Data Providers, you can enable and start some data source providers, that are provided as a starting point. Those can be modified or other data sources added.
Next steps
Now that you have a working setup, you can consult the documentation for the commands that you can run on the platform.